Sources: linuxquestions.org
Inspired by the above link here are the 2 commands that saved the day:
hwclock --hctosys --localtime

hwclock --systohc --localtime
Sources: linuxquestions.org
Inspired by the above link here are the 2 commands that saved the day:
hwclock --hctosys --localtime
hwclock --systohc --localtime
Source: askubuntu.com
Ubuntu has an error reporting system called apport which tries to catch all program crashes in the background and report them to help the developers.
It seems that some reports get stuck and try to resubmit, but disabling apport is not a desirable solution.
Open a terminal and remove all old crash-reports that might exist in the crash -report directory:
sudo rm /var/crash/*
After a reboot the popups are gone.
If you don't want to reboot, you can close all open popups with:
killall system-crash-notification
(Any further new pop-ups still should be investigated. If you want to see the details,
look in /var/crash/ for any new reports)
Sources:
control-escape.com // skorks.com
The overall opinion is keep it simple but for a healthy installation these are the 4 partitions with approximate sizes that should be created:
/boot - 500MB (no need to be ext3)
Swap - 50% - 100% of the physical RAM
root (/) - 10GB (bigger if software intended to be installed is huge)
/home - rest of the drive as this is the "user data" partition.
- The Long (old) Version
- The Short (new) Version
Let's get a list of all the running processes and they're PID. Open up the terminal (CTRL+ALT+T) and paste the following:
ps -ATake a note of the PID number. Now:
kill -9 (PID)
Now for a little bit of customization, you can add the grep pipe feature to filter only the application that you want. For example:
ps -A | grep firefox
or simply run
pgrep firefox
Will give you only the lines that contain the word "Firefox" as the process, so you can kill only that.
Why not combine the two in one simple command? Try:
kill -9 $(pgrep firefox)
This command will start the "kill" but it will automatically search for any process named "firefox" so be sure of the process that you want to kill.
Now for the "kill" command, you can use the following signals:
| Number | Name (short name) | Description | Used for |
|---|---|---|---|
| 0 | SIGNULL (NULL) | Null | Check access to pid |
| 1 | SIGHUP (HUP) | Hangup | Terminate; can be trapped |
| 2 | SIGINT (INT) | Interrupt | Terminate; can be trapped |
| 3 | SIGQUIT (QUIT) | Quit | Terminate with core dump; can be trapped |
| 9 | SIGKILL (KILL) | Kill | Forced termination; cannot be trapped |
| 15 | SIGTERM (TERM) | Terminate | Terminate; can be trapped |
| 24 | SIGSTOP (STOP) | Stop | Pause the process; cannot be trapped. This is default if signal not provided to kill command. |
| 25 | SIGTSTP (STP) | Terminal | Stop/pause the process; can be trapped |
| 26 | SIGCONT (CONT) | Continue | Run a stopped process |
Note the specific mapping between numbers and signals can vary between Unix versions.
Amazing info right? Yes it is. And now that you understood how to use the above commands, forget them and use this one:
pkill firefox
This command will find the Process, the PID and kill it AIO (all in one).

Ubuntu uses apt for package management. Apt stores a list of repositories or software channels in the file
/etc/apt/sources.list
By editing this file from the command line, we can add, remove, or temporarily disable software repositories.
 Note: It's always a good idea to backup a configuration file like sources.list before you edit it. To do so, issue the following command:
sudo cp /etc/apt/sources.list /etc/apt/sources.list.backup
Typically, the beginning of the file /etc/apt/sources.list looks like this:
# sources.list
#deb cdrom:[Ubuntu 13.10 _Saucy Salamander_ - Release i386 (20131016.1)]/ saucy main restricted

# See http://help.ubuntu.com/community/UpgradeNotes for how to upgrade to
# newer versions of the distribution.
deb http://ch.archive.ubuntu.com/ubuntu/ saucy main restricted
deb-src http://ch.archive.ubuntu.com/ubuntu/ saucy main restricted
#...
The lines without hashes are apt repository lines. Here's what they say:
deb: These repositories contain binaries or precompiled packages. These repositories are required for most users.
deb-src: These repositories contain the source code of the packages. Useful for developers.
http://archive.ubuntu.com/ubuntu: The URI (Uniform Resource Identifier), in this case a location on the internet. See the official mirror list or the self-maintained mirror list to find other mirrors.
saucy is the release name or version of your distribution.
main & restricted are the section names or components. There can be several section names, separated by spaces.
For other Ubuntu releases you would replace the 'saucy' with the current version you have installed ('precise', 'quantal', 'raring', 'saucy', 'trusty', ...) Type lsb_release -sc to find out your release.
sudo add-apt-repository "deb http://us.archive.ubuntu.com/ubuntu/ saucy universe multiverse"
sudo add-apt-repository ppa:<repository-name>
Don't forget to retrieve the updated package lists:
sudo apt-get update
Initial Installation
Numlock On
Installing Teamviewer
Installing Java Runtime Environment
Installing Spotify
CCleaner Alternative
Useful Stuff
Search for package or package description using the apt command
List all available Hard Drives and Partitions
Game Tiiiiiiiiiiiime
List devices
Checking temperature sensors from Command Line
Sharing Linux folders for Windows machines
RSSOwl - A Cool RSS reader
How to Disable Home Folder Encryption After Installing Ubuntu
Resolving "the disk drive for /dev/mapper/cryptswap1 is not ready yet or not present" error during boot up.
Dropbox for Linux
Auto-mounting a Windows partition on each restart.
Installing PopCorn Time using a PPA.
First of all, one problem I had is when Ubuntu Installation launched there was no backlight. The first try was with ubuntu version 12.04. When I tried installing Ubuntu 13.10 I didnt' have this issue. Here is a simple fix for versions that do have this:
When you boot the disc or usb drive and you see the "Purple Ubuntu screen" or Ubuntu splash, right away, hold the Fn button and dim your screen brightness then brighten it back up. If you forget to do this and the splash (or purple screen) is gone then the backlight wont probably work.
Once ubuntu is installed and you boot from the HDD, do the same when you boot Ubuntu. When you see the purple screen, right away Hold Fn button and dim the screen down and up.
Second issue was that I couldn't adjust the backlight when Ubuntu booted normally. To fix this and make Ubuntu turn the backlight all the way up follow this:
Open terminal (CTRL+ALT+T).
Type in:
gksudo gedit /etc/rc.local
and hit enter.
Find the line "exit 0".
Above exit 0, paste the following line:
setpci -s 00:02.0 F4.B=00
Save the file and exit Gedit. If you get a popup message the "untitled document" isn't saved, ignore it and close without saving.
This fix will automatically make the backlight turn on upon boot.
Now to ensure you can adjust your backlight once Ubuntu has booted:
In terminal, enter the command:
sudo gedit /etc/default/grub
In the file, find the line: GRUB_CMDLINE_LINUX=""
Change that line to: GRUB_CMDLINE_LINUX="acpi_osi=Linux"
Save the file and exit gedit. If you get a popup message the "untitled document" isn't saved, ignore it and close without saving.
Now in terminal, type the command:
sudo update-grub
Wait for the process to finish then exit terminal. Reboot your PC.
Once rebooted, you will notice the purple screen, but you don't need to adjust your backlight this time. Backlight may go out during the boot process but it will turn back up.
A couple of things to consider:
What I realized after these changes is that the Brightness Bar is not displayed inside Ubuntu when playing with the brightness. For some users, the backlight still won't automatically turn on. You can however use the brightness controls after Ubuntu is booted to turn the backlight on. If after applying all the above changes, the backlight won't turn on:
In the terminal type:
gksudo gedit /etc/rc.local",
find the line "setpci -s 00:02.0 F4.B=00" and change it to "setpci -s 00:02.0 F4.B=FF". (without quotes). Save and reboot.
Also, you'll notice if you go into standby (and I think Hibernate as well), the backlight will probably be off.
For some users, the backlight keys will be backwards. Mine aren't, but some users' are. It's not that big of a bug.
I use the numpad that I'm fortunate enough to have on my laptop enough and I noticed that it was not on each time I booted my machine up. A few google searches later this solution came up from the Ubuntu Community page:
System Settings > Keyboard Layout > Options > Miscellaneous compatibility options
Check "Default numeric keypad keys"
This setting takes effect after Login and has no effect at the Login screen or consoles. (couldn't find this on Ubuntu 13.10)
Enabling Numlock on startup can be done of several different ways. First install numlockx:
sudo apt-get install numlockx
Place command with init scripts
sudo sed -i 's|^exit 0.*$|# Numlock enable\n[ -x /usr/bin/numlockx ] \&\& numlockx on\n\nexit 0|' /etc/rc.local
Download the .deb files directly from the Teamviewer website and install them through the Ubuntu Software Center (just double click it and USC will start).
The best practice for this is to just download the packages from the respective sites and install through the .deb with your preferred method:
http://apt.ubuntu.com/p/openjdk-7-jre (the JRE file)
http://apt.ubuntu.com/p/icedtea-7-plugin (the Browser Plugin)
I used the command line version:
1.sudo apt-get install openjdk-7-jre
2.sudo apt-get install icedtea-7-plugin
For Spotify to install correctly, add the repository, add the key, update and then install the client by copy-pasting the following lines on the terminal:
1.sudo add-apt-repository "deb http://repository.spotify.com stable non-free"
2.sudo apt-key adv --keyserver hkp://keyserver.ubuntu.com:80 --recv-keys 94558F59
3.sudo apt-get update
4.sudo apt-get install spotify-client
Being a strong Windows user since Windows 3.11 (!!!) I'm experimenting with lots of different applications on this platform. CCleaner is my favorite one. Yes it hides my dirty laundry but other than that it keeps my TMPs neat and tidy ... way too often (thank you for that Microsoft). Trying to find an alternative for Linux I discovered the perfect one:
Open up the terminal and paste:
sudo apt-get install bleachbit
After installation run it and choose your cleaning options carefully. Run a preview to see what will get cleaned and the clean it if you are satisfied. Use the "Root" version if you get any errors while cleaning.
At some point I needed to add some extra memory. And since I'm a lazy a$$ I didn't want to shutdown the PC, turn it over and unscrew everything to find what type of RAM was pre-installed. I remember using the CPU-Z software for Windows which was absolutely amazing so I started a new journey to find something relevant for Linux. Here are some good (but not really "there") alternative.
1. CPU-G
Simple installation
sudo add-apt-repository ppa:cpug-devs/ppa
sudo apt-get update
sudo apt-get install cpu-g
2. I-Nex
sudo add-apt-repository ppa:nemh/gambas3sudo add-apt-repository ppa:i-nex-development-team/stablesudo apt-get updatesudo apt-get install i-nex
3. Built-in command line option
sudo dmidecode –type memorySome times you don't know package name but aware of some keywords to search the package. Once you got package name you can install it using apt-get -i {package-name} command:
apt-cache search "Text-to-search"
apt-cache search "httpd"
apt-cache search "web server"
apt-cache search "web server"| grep something
Open up a terminal aaaaaaaaaaaaand:
sudo fdisk -lLinux in General is not very famous for its gaming enthusiasts. But ... you can easily remember these old amazing console games where one extra live could make a real difference. So here's how to simply emulate them on Ubuntu.
1. SNES (Super Nintendo Entertainment System)
The most straightforward Emulator I've found is the ZSnes. It already exists on the default repositories so:
sudo apt-get update
sudo apt-get install zsnes
and I've seen that one more library should be installed:
sudo apt-get install libsdl1.2debian
At one point I needed to list the interfaces on my Laptop exactly as they are mentioned on Ubuntu for an application that ask specificly for that names. So here are some commands and their results.
e.g.:
lspci
lspci | grep -i eth
Using the grep option we get all results that have "eth" in any part of the line and -i switch ignores the case. In this example it is "Ethernet" instead of "ethernet" so without -i there would be no result as there is no lower case "eth". So here is how it looks on my PC:
$ lspci |grep -i eth
05:00.0 Ethernet controller: Qualcomm Atheros AR8132 Fast Ethernet (rev c0)
But wait ... I have an amazing Wireless Device in my Laptop also. Where is it? Here comes the solution:
ip link
It should look something like:
$ ip link
1: lo: <LOOPBACK,UP,LOWER_UP> mtu 65536 qdisc noqueue state UNKNOWN mode DEFAULT
 link/loopback 00:00:00:00:00:00 brd 00:00:00:00:00:00
2: eth0: <NO-CARRIER,BROADCAST,MULTICAST,UP> mtu 1500 qdisc pfifo_fast state DOWN mode DEFAULT qlen 1000
 link/ether xx:xx:xx:xx:xx:xx brd ff:ff:ff:ff:ff:ff
3: wlan0: <BROADCAST,MULTICAST,UP,LOWER_UP> mtu 1500 qdisc mq state UP mode DORMANT qlen 1000
 link/ether xx:xx:xx:xx:xx:xx brd ff:ff:ff:ff:ff:ff
Win situation right? Here's another simple command for quick results:
ifconfig -s -a
Here we use the ifconfig command to list the Status (-s) of All (-a) Network Interfaces present.
sudo apt-get install lm-sensorsAfter installation type the following in terminal
sudo sensors-detect
You may also need to run:
sudo service module-init-tools start
Answer Yes for all questions that will follow.
At the end of sensors-detect, a list of modules that needs to be loaded will be displayed. Type "yes" to have sensors-detect insert those modules into /etc/modules, or edit /etc/modules yourself.
Finally to get your CPU temperature type:
sudo service kmod start
to read the changes made by sensors and insert the modules into the kernel and type
sensors
Output:
acpitz-virtual-0
Adapter: Virtual device
temp1: +51.0°C (crit = +110.0°C)
coretemp-isa-0000
Adapter: ISA adapter
Core 0: +49.0°C (high = +105.0°C, crit = +105.0°C)
Core 1: +49.0°C (high = +105.0°C, crit = +105.0°C)
sudo apt-get install hddtemp

sudo hddtemp /dev/sda
/dev/sda: ST320LT007-9ZV142: 39°CIt used to be quite a journey to do this. Installing Samba, changing the configuration for some files etc etc. Now it's much more simple by doing these easy steps:
Everybody loves a good newspaper. Too 1990's though no? Here comes the RSS News Feeds and with the RSSOwl you can have all of your favorite news with a single click. Here's how to install it through the Terminal using the GetDeb repository(CTRL+ALT+T)
sudo wget -c http://archive.getdeb.net/install_deb/getdeb-repository_0.1-1~getdeb1_all.deb
sudo dpkg -i getdeb-repository_0.1-1~getdeb1_all.deb
sudo apt-get update
sudo apt-get install rssowl
The process involves
Easy as 1-2-3 ... 4 ... 5 ... aaaaaand 6 if you include the logging back in with your user name to see if everything is working.
1. To create the backup copy, launch a terminal while you’re logged in and run the following command, replacing user with your username:
sudo cp -rp /home/user /home/user.backup
The -rp options here tell cp to copy the directory recursively – that is, copy everything inside it – and to preserve the file ownership and permission information. Open the /home/user.backup directory on your system and verify that the backup was created successfully. All your files should be there.
2. You can’t remove the encryption while you’re logged in, so you’ll have to switch to a different user account first. The simplest way to do this is by creating another user account with administrator (sudo) privileges. Log out from the panel after creating the other user account. Select your temporary user account on the login screen and log in. fire up a terminal and run the following command to delete your current, encrypted home directory. Be sure you have a backup before deleting the home directory! And be careful when running sudo rm -rf commands – these can quickly delete important files if you’re not careful.
sudo rm -rf /home/user
(Remember to replace user with your username.)
3. Delete the .ecryptfs folder in your backup folder. The encryption utilities won’t uninstall until you delete this folder.:
sudo rm -rf /home/user.backup/.ecryptfs
4. Remove the encryption utilities from your system:
sudo apt-get remove ecryptfs-utils libecryptfs0
5. Finally, restore the unencrypted backup of your home directory to its original location:
sudo mv /home/user.backup /home/user
Your home directory is now unencrypted. You can log out (or restart your system) and log in normally. You may want to delete the temporary user account from the User Accounts window.
the disk drive for /dev/mapper/cryptswap1 is not ready yet or not present" error during boot up.I always saw this error while booting but didn't actually have any issues within Linux. After I formatted and reinstaled my Windows (thank you Linux for not making me format you every other month), I noticed that during boot it asked me to press "S" if I wanted to continue! Frustrating as trying to clear the bottom of your Nutella jar I know. It probably has to do with the fact that I swapped the Hard Drives' physical place on the motherboard. What used to be "sda" is now "sdb" and vice versa but anyway this should apply for all relevant "cryptswap errors" OK here are the steps:
sudo swapoff -a/etc/crypttab (e.g., sudo nano -w /etc/crypttab or sudo -H gedit /etc/cryptab for a GUI editor) and put a # at the beginning of the line that starts with cryptswap1. Save the file./dev/mapper/cryptswap1 in /etc/fstab.linux-swap. Make sure to get the right partition; if you get the wrong one, you'll lose possibly important data! The line you commented out in crypttab should give the correct partition name (it comes right after /dev/).sudo mkswap /dev/sd# repacing # with that same device name. Part of that command's output should be text that says UUID=*** where *** is a string of letters and numbers./etc/initramfs-tools/conf.d/resume, find the line that says RESUME=UUID= followed by letters and numbers like (but not identical to) *** from the last step. Replace them with *** (i.e., with the letters and numbers mkswap gave after UUID=.sudo swapon /dev/sd# (with the same /dev/sd# as you had in steps 4 and 5 above).sudo ecryptfs-setup-swap.swapon -s will check to see if swap is successfully enabled.Just a note before explaining everything. Installation didn't go well 2 out of 3 times I tried. But here it is:
Go to the official https://www.dropbox.com/ site and hit download in the top right corner. It will automatically sense that you are a Linux rebel so it will give you the relevant distros and package to download. Since we're in Ubuntu here, I'm choosing the Ubuntu .deb file and the correct architecture of 32 bit since my inntallation is 32 bit. Save the file and run it by double clicking it inside the folder you saved it. This should open the Ubuntu Software Manager and suggest you should install the software. So hit install and wait for it to finish. The next step is a bit foggy since I did the installation a while back and I can't exactly remember how it went, but it will certainly ask for a nautilus restart in order for the daemon to function properly. This is where everything started to fall apart in the first 2 installations. The restart never completed successfully and my Dropbox could never connect. Finally I made it and everything is working fine now.
First of all let's determine what type of File System our Windows partition uses by:
sudo fdisk -lu
Read between the lines and you should see your Windows partitions with the information we need:
Device Boot Start End Blocks Id System
| Device | Boot | Start | End | Blocks | Id | System |
| /dev/sdb1 | * | 2048 | 718847 | 358400 | 7 | HPFS/NTFS/exFAT |
| /dev/sdb2 | 718848 | 625137663 | 312209408 | 7 | HPFS/NTFS/exFAT |
See? I told you this would happen. It looks like you have two beautiful NTFS partitions right there. But wait. I don't like the look of the first one. It has Boot written all over ... and the Blocks (KBytes) suggest this is too small. It is! This the Boot Partition Windows creates during the installation so you can just ignore it. There is nothing in there that should matter to you.
So now that we understood the fdisk use for this particular situation, let's forget about it and move to the actual command that will give us even more important information. I know I tricked you ... wanna fight about it?
sudo blkid
/dev/sda6: UUID="c92bfca1-8fb7-4ec8-91ef-27033eec8b58" TYPE="ext4"
/dev/sdb1: LABEL="System Reserved" UUID="F00073020072CEDA" TYPE="ntfs"
/dev/sdb2: LABEL="Windows 8" UUID="CE46791F46790A0B" TYPE="ntfs"
There, do you see it again? It's the same sdb1 Device but now you see the label: System Reserved. We don't want that do we? Let's keep our Windows 8 partition. Take a note of the UUID because we need this.
You will now need to create a mountpoint for each NTFS partition that you wish to mount. We are going to add one entry only for /dev/sdb2. From a terminal:
sudo mkdir /media/Windows
You can of course choose a different name: Data, Mother, Father, UseTheForce, PeanutButterJellyTime ...
Now comes the tricky part. Editing the fstab file. The fstab file typically lists all available disks and disk partitions, and indicates how they are to be initialized or otherwise integrated into the overall system's file system.
Make a copy of the current fstab:
sudo cp /etc/fstab /etc/fstab.orig
Edit:
gksudo gedit /etc/fstab
If you get an error / warning that the gksudo command is available through the apt-get command then download it with (I think) the following command:
sudo apt-get install gksu
Now paste the following on your fstab end:
UUID=CE46791F46790A0B /media/Windows ntfs-3g defaults,windows_names,locale=en_US.utf8 0 0
replacing the UUID and other info with your own.
Now save the file and run:
sudo mount -a
If you want to disable mounting the specific Partition from within Nautilus then change the above fstab line to this:
UUID=CE46791F46790A0B /mnt/Windows ntfs noauto,umask=222 0 0
Which actually means that you have to create a Mountpoint folder inside /mnt and not /media as we did.
For a FAT32 Partition a general line should be:
UUID=CE46791F46790A0B /media/Windows vfat defaults,user,exec,uid=1000,gid=100,umask=000 0 0
This would make all of the files executable but ... OK. Why not?
The only reason I wanted this is so I could direct Dropbox to Sync all files on the Windows folder so that I don't have a duplicate 8GB Dropbox folder while using an SSD for my Linux.
To add the WebUpd8 Popcorn Time PPA and install the app in Ubuntu / Linux Mint (and elementary OS along with Ubuntu derivatives: Xubuntu, Kubuntu, etc.), use the following commands:
sudo add-apt-repository ppa:webupd8team/popcorntime
sudo apt-get update
sudo apt-get install popcorn-time
apt-get install <package> Downloads <package> and all of its dependencies, and installs or upgrades them. This will also take a package off of hold if it was put on. See below for more info on hold.
apt-get remove [--purge] <package> Removes <package> and any packages that depend on it. --purge specifies that packages should be purged, see dpkg -P for more information.
apt-get update Updates packages listings from Debian mirrors, should be run at least once a day if you install anything that day, and every time after /etc/apt/sources.list is changed.
apt-get upgrade [-u] Upgrades all packages installed to newest versions available. Will not install new or remove old packages. If a package changes dependencies and requires installation of a new package, it will not be upgraded, it will be put on hold instead. apt-get upgrade will not upgrade packages put on hold (that is the meaning of hold). See below for how to manually put packages on hold. I suggest the `-u' option as well, because then you can see what packages are going to be upgraded.
apt-get dist-upgrade [-u] Similar to apt-get upgrade, except that dist-upgrade will install or remove packages to satisfy dependencies.
apt-cache search <pattern> Searches packages and descriptions for <pattern>.
apt-cache show <package> Shows the full description of <package>.
apt-cache showpkg <package> Shows a lot more detail about <package>, and its relationships to other packages.
dselect
console-apt
aptitude
gnome-apt Graphical front ends to APT (some of these may be in their own package, that must be installed before use). While dselect is arguably the most powerful, it's also the oldest and hardest to use.
dpkg -i <package.deb> Installs a Debian package file; one that you downloaded manually, for example.
dpkg -c <package.deb> Lists the contents of <package.deb>, a .deb file.
dpkg -I <package.deb> Extracts package information from <package.deb>, a .deb file.
dpkg -r <package> Removes an installed package named <package>
dpkg -P <package> Purges an installed package named <package>. The difference between remove and purge is that while remove only deletes data and executables, purge also deletes all configuration files in addition.
dpkg -L <package> Gives a listing of all the files installed by <package>. See also dpkg -c for checking the contents of a .deb file.
dpkg -s <package> Shows information on the installed package <package>. See also apt-cache show for viewing package information in the Debian archive and dpkg -I for viewing package information extracted from a .deb file.
dpkg-reconfigure <package> Reconfigures an installed package, if it uses debconf (debconf provides that consistent configuration interface for package installation). You can reconfigure debconf itself if you want to change the front-end or priority of questions asked. For example, to reconfigure debconf with the dialog front-end, you simply run:
dpkg-reconfigure --frontend=dialog debconf
echo ``<package> hold'' | dpkg --set-selections Put <package> on hold (command line method)
dpkg --get-selections ``<package>'' Get the current status of <package> (command line method)
dpkg -S <file> Searches for <file> in package database, telling you which packages have that file in them.
apt-get source [-b] <package> Download the source Debian package for <package> and extract it. You must have deb-src lines in your /etc/apt/sources.list for this to work. If you supply the `-b' option and you are currently root, then the package will be automatically built if possible.
apt-get build-dep <package> Download and install the packages necessary to build the source Debian package <package>. This feature is only present in apt version 0.5 and up. Currently this means that woody and above contain this functionality. If you have an older version of apt then the easiest way to find out the build dependencies is to look in the debian/control file in the source package directory. A common usage of this command is in conjunction with apt-get source -b. For example (as root):
apt-get build-dep <package>
apt-get source -b <package>
Will download the source package, all of its build dependencies, and attempt to compile the source package.
dpkg-source -x <package.dsc> If you have downloaded the source package for a program manually, which includes several files such as a .orig.tar.gz (or .tar.gz if it is Debian native), a .dsc, and a .diff.gz (if it is not Debian native), then you can unpack the source package using this command on the .dsc file.
dpkg-buildpackage Builds a Debian package from a Debian source tree. You must be in the main directory of the source tree for this to work. Sample usage:
dpkg-buildpackage -rfakeroot -uc -b
Where `-rfakeroot' instructs it to use the fakeroot program to simulate root privileges (for ownership purposes), `-uc' stands for ``Don't cryptographically sign the changelog'', and `-b' stands for ``Build the binary package only''
debuild A handy wrapper script around dpkg-buildpackage that will automatically take care of using fakeroot or not, as well as running lintian and gpg for you.
dpkg --configure --pending If dpkg quits with an error while apt-get install, upgrade, or dist-upgradeing try running this to configure the packages that were already unpacked. Then try apt-get install, upgrade, or dist-upgrade -f, and then try apt-get install, upgrade, or dist-upgrade again. Repeat as needed. This usually resolves most dependency problems (also, if it mentions a specific package for some reason, you might want to try installing or removing that package)
apt-get install -f
apt-get upgrade -f
apt-get dist-upgrade -f Attempt to fix dependencies while doing one of the above. Note that apt-get install -f does not require a <package> argument.
Source: www.cyberciti.biz
Syntax |
Description | Example |
| dpkg -i {.deb package} | Install the package | dpkg -i zip_2.31-3_i386.deb |
| dpkg -i {.deb package} | Upgrade package if it is installed else install a fresh copy of package | dpkg -i zip_2.31-3_i386.deb |
| dpkg -R {Directory-name} | Install all packages recursively from directory | dpkg -R /tmp/downloads |
| dpkg -r {package} | Remove/Delete an installed package except configuration files | dpkg -r zip |
| dpkg -P {package} | Remove/Delete everything including configuration files | dpkg -P apache-perl |
| dpkg -l | List all installed packages, along with package version and short description | dpkg -l dokg -l | less dpkg -l '*apache*' dpkg -l | grep -i 'sudo' |
| dpkg -l {package} | List individual installed packages, along with package version and short description | dpkg -l apache-perl |
| dpkg -L {package} | Find out files are provided by the installed package i.e. list where files were installed | dpkg -L apache-perl dpkg -L perl |
| dpkg -c {.Deb package} | List files provided (or owned) by the package i.e. List all files inside debian .deb package file, very useful to find where files would be installed | dpkg -c dc_1.06-19_i386.deb |
| dpkg -S {/path/to/file} | Find what package owns the file i.e. find out what package does file belong | dpkg -S /bin/netstat dpkg -S /sbin/ippool |
| dpkg -p {package} | Display details about package package group, version, maintainer, Architecture, display depends packages, description etc | dpkg -p lsof |
| dpkg -s {package} | grep Status | Find out if Debian package is installed or not (status) | dpkg -s lsof | grep Status |
Source: www.cyberciti.biz
| Syntax | Description | Example(s) |
| apt-get install {package} | Install the new package. If package is installed then try to upgrade to latest version | apt-get install zip apt-get install lsof samba mysql-client |
| apt-get remove {package} | Remove/Delete an installed package except configuration files | apt-get remove zip |
| apt-get --purge remove {package} | Remove/Delete everything including configuration files | apt-get --purge remove mysql-server |
| apt-get update apt-get upgrade |
Resynchronize the package index files and Upgrade the Debian Linux system including security update (Internet access required) | apt-get update apt-get upgrade |
| apt-get update apt-get dist-upgrade |
Usually use to upgrade to Debian distribution. For example Woody to Sarge upgrade. 'dist-upgrade' in addition to performing the function of upgrade, also intelligently handles changing dependencies with new versions of packages; apt-get has a "smart" conflict resolution system, and it will attempt to upgrade the most important packages at the expense of less important ones if necessary. | apt-get update apt-get dist-upgrade |
This tutorial is based on the Raspbian Distro for the Raspberry Pi. The commands should be identical to other Linux Distros but correct me if I'm wrong.
List all available network interface using the following command:
cat /etc/network/interfaces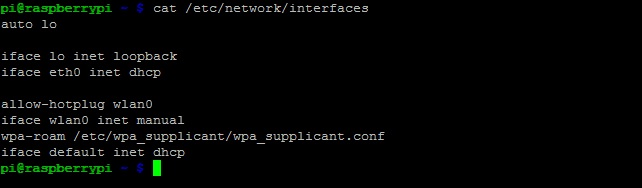
The result "iface eth0 inet dhcp" shows that this interface is using DHCP to get an IP address.
Run the following command:
ifconfig
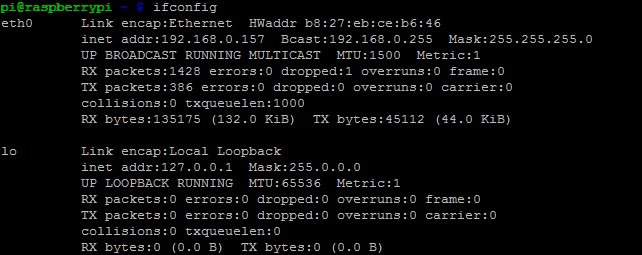
For the LAN part we want to take a note of the information shown on the "eth0" part:
| inet addr:192.168.0.157 | This is our Linux's current IP address |
| Bcast:192.168.0.255 | This is the Broadcast IP range |
| Mask:255.255.255.0 | This is the Subnet Mask address |
Now run:
netstat -nror
route -nTake a note of the following information:
| Gateway Address – 192.168.0.254 | This is your Router's IP |
| Destination Address – 192.168.0.0 | This is your Network Identifier (usually) |
For this we need to edit the Configuration files using a Text Editor. You can use any editor you like. For this example I will use "nano:
sudo nano /etc/network/interfaces
Remember the line "iface eth0 inet dhcp"? Time to change the "dhcp" value to "static":
Below this line, enter the information found earlier as follows (it should copy-paste just fine):
| address | 192.168.0.157 |
| netmask | 255.255.255.0 |
| network | 192.168.0.0 |
| broadcast | 192.168.0.255 |
| gateway | 192.168.0.1 |
On the address field choose the IP that you want.
You're all set. Hit CTRL-O and CTRL-X to Save and Exit the file, reboot (sudo reboot) and test your new IP.
Designed, maintained and lubricated since 2013 by George.
© Copyright gVrakas.com
All rights reserved.