This tutorial is based on the Raspbian Distro for the Raspberry Pi. The commands should be identical to other Linux Distros but correct me if I'm wrong.
Step 1 - Finding out if our LAN is using DHCP or static IP Address.
List all available network interface using the following command:
cat /etc/network/interfaces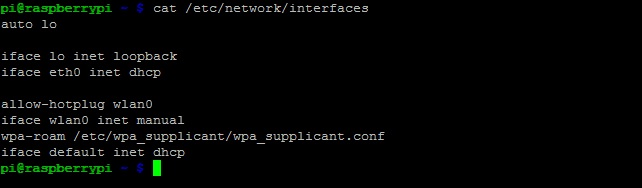
The result "iface eth0 inet dhcp" shows that this interface is using DHCP to get an IP address.
Step 2 - Extra information on the Linux and Router IP Configuration
Run the following command:
ifconfig
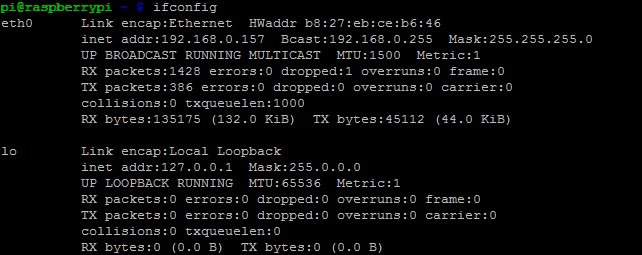
For the LAN part we want to take a note of the information shown on the "eth0" part:
| inet addr:192.168.0.157 | This is our Linux's current IP address |
| Bcast:192.168.0.255 | This is the Broadcast IP range |
| Mask:255.255.255.0 | This is the Subnet Mask address |
Now run:
netstat -nror
route -nTake a note of the following information:
| Gateway Address – 192.168.0.254 | This is your Router's IP |
| Destination Address – 192.168.0.0 | This is your Network Identifier (usually) |
Step 3 - Applying the changes in the configuration file
For this we need to edit the Configuration files using a Text Editor. You can use any editor you like. For this example I will use "nano:
sudo nano /etc/network/interfaces
Remember the line "iface eth0 inet dhcp"? Time to change the "dhcp" value to "static":
Below this line, enter the information found earlier as follows (it should copy-paste just fine):
| address | 192.168.0.157 |
| netmask | 255.255.255.0 |
| network | 192.168.0.0 |
| broadcast | 192.168.0.255 |
| gateway | 192.168.0.1 |
On the address field choose the IP that you want.
You're all set. Hit CTRL-O and CTRL-X to Save and Exit the file, reboot (sudo reboot) and test your new IP.